07.后台系统-医院设置前端
# 开发流程
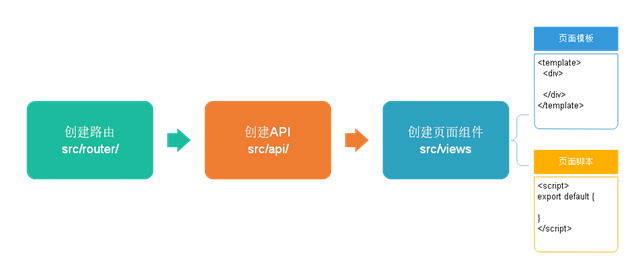
# 定义路由
在项目 yygh-admin的src/router/index.js文件中添加如下路由
  {
    path: '/hospSet',
    component: Layout,
    redirect: '/hospSet/list',
    name: '医院设置管理',
    meta: { title: '医院设置管理', icon: 'el-icon-s-help' },
    children: [
      {
        path: 'list',
        name: '医院设置列表',
        component: () => import('@/views/hospSet/list'),
        meta: { title: '医院设置列表', icon: 'table' }
      },
      {
        path: 'add',
        name: '医院设置添加',
        component: () => import('@/views/hospSet/add'),
        meta: { title: '医院设置添加', icon: 'tree' }
      }
    ]
  },
2
3
4
5
6
7
8
9
10
11
12
13
14
15
16
17
18
19
20
21
在views/hospSet中添加list.vue和add.vue文件,格式如下
<template>
  <div class="app-container">
    医院设置添加
  </div>
</template>

<script>

export default {
  data() {
    return {}
  },
  created() {
  },
  methods: {}
}
</script>
2
3
4
5
6
7
8
9
10
11
12
13
14
15
16
17
# 列表页面实现
# 定义api模块
创建 src/api/hospset.js文件,并添加如下内容
import request from '@/utils/request'

export default {
  getHospSetList(current, limit, searchObj) {
    return request({
      url: `/admin/hosp/hospitalSet/findPageHospSet/${current}/${limit}`,
      method: 'post',
      data: searchObj // 使用json
    })
  }
}
2
3
4
5
6
7
8
9
10
11
# 配置项目访问url
修改 .env.development中的路径配置,配置为开发服务器地址
# base api
VUE_APP_BASE_API = 'http://localhost:8201'
2
# 定义管理列表 vue页面
修改views/hospSet/list.vue文件
<template>
  <div class="app-container">
    医院设置列表
  </div>
</template>

<script>

import hospset from '@/api/hospset'

export default {
  // 定义变量和初始值
  data() {
    return {
      current: 1, // 定义当前页
      limit: 10, // 定义每页记录数
      searchObj: { hosname: '', hoscode: '' }, // 条件封装的对象
      list: [] // 每页数据的集合
    }
  },
  created() { // 在页面渲染之前
    // 调用methods中的方法,得到数据
    this.fetchList()
  },
  methods: {
    fetchList() {
      hospset.getHospSetList(this.current, this.limit, this.searchObj)
        .then(res => { // res 返回的数据
          console.log(res)
        }) // 请求成功
        .catch(error => {
          console.error(error)
        }) // 请求失败
    }
  }
}
</script>
2
3
4
5
6
7
8
9
10
11
12
13
14
15
16
17
18
19
20
21
22
23
24
25
26
27
28
29
30
31
32
33
34
35
36
37
访问该页面,测试网络配置接口是否正常
# 处理跨域问题
在请求接口的时候出现如下异常
Access to XMLHttpRequest at 'http://localhost:8201/admin/hosp/hospitalSet/findPageHospSet/1/10' from origin 'http://localhost:9528' has been blocked by CORS policy: Response to preflight request doesn't pass access control check: No 'Access-Control-Allow-Origin' header is present on the requested resource.
由于前端和后端访问的端口号不同,导致了跨域的出现,而为了安全性考虑,默认不允许进行跨域访问
跨域,三个条件,出现一个就会导致跨域问题
- 访问协议的不同,如http 和 https
- 访问地址或域名的不同,如192.168.1.1 和 127.0.0.1 ,或者 www.baidu.com 和 www.google.com
- 也包含二级域名 item.jd.com 与 miaosha.jd.com
- 端口号的不同,如 9528 和 8201
解决跨域,在接口服务提供端开启允许跨域访问配置
- 在医院设置服务中,配置@CrossOrigin 注解
@Api(tags = "医院设置管理")
@RestController
@RequestMapping("/admin/hosp/hospitalSet")
// 允许跨域访问
@CrossOrigin
public class HospitalSetController {
2
3
4
5
6
7
# 修改前端返回状态码判断
由于前端自定义判断返回码不是20000为异常,需要调整
修改src/utils/request.js
...
// if the custom code is not 20000, it is judged as an error.
if (res.code !== 200) {
    Message({
        message: res.message || 'Error',
        type: 'error',
        duration: 5 * 1000
    })
    return Promise.reject(new Error(res.message || 'Error'))
...
2
3
4
5
6
7
8
9
10
# 管理列表页面添加table
使用了elementUI的table组件,scope 表示该行的数据对象,可通过scope.row获取到该行数据
prop 字段名和返回值中的字段名对应,可以直接赋值
如果要自定义显示,使用插槽,进行自定义修改,如状态列
<template>
  <div class="app-container">
    <!-- banner列表 -->
    <el-table :data="list" stripe style="width: 100%">
      <el-table-column type="index" width="50"/>
      <el-table-column prop="hosname" label="医院名称"/>
      <el-table-column prop="hoscode" label="医院编号"/>
      <el-table-column prop="apiUrl" label="api基础路径" width="200"/>
      <el-table-column prop="contactsName" label="联系人姓名"/>
      <el-table-column prop="contactsPhone" label="联系人手机"/>
      <el-table-column label="状态" width="80">
        <template slot-scope="scope">
          {{ scope.row.status === 1 ? '可用' : '不可用' }}
        </template>
      </el-table-column>
    </el-table>
  </div>
</template>

<script>

import hospset from '@/api/hospset'

export default {
  // 定义变量和初始值
  data() {
    return {
      current: 1, // 定义当前页
      limit: 10, // 定义每页记录数
      searchObj: { hosname: '', hoscode: '' }, // 条件封装的对象
      list: [], // 每页数据的集合
      total: 0 // 总记录数
    }
  },
  created() { // 在页面渲染之前
    // 调用methods中的方法,得到数据
    this.fetchList()
  },
  methods: {
    fetchList() {
      hospset.getHospSetList(this.current, this.limit, this.searchObj)
        .then(res => { // response 返回的数据
          console.log(res)
          // 记录的列表
          this.list = res.data.records
          // 总记录数
          this.total = res.data.total
        }) // 请求成功
        .catch(error => {
          console.error(error)
        }) // 请求失败
    }
  }
}
</script>
2
3
4
5
6
7
8
9
10
11
12
13
14
15
16
17
18
19
20
21
22
23
24
25
26
27
28
29
30
31
32
33
34
35
36
37
38
39
40
41
42
43
44
45
46
47
48
49
50
51
52
53
54
55
# 分页查询
添加分页插件
- 注意:使用
current-page.sync可以同步当前current值,方便分页操作,分页方法 fetchList 不做修改
<template>
  <div class="app-container">
    <!-- banner列表 -->
...
    </el-table>
    <!-- 分页 -->
    <el-pagination
      :current-page.sync="current"
      :page-size="limit"
      :total="total"
      style="padding: 30px 0; text-align: center;"
      layout="total, prev, pager, next, jumper"
      @current-change="fetchList" />
  </div>
</template>
2
3
4
5
6
7
8
9
10
11
12
13
14
15
# 条件查询
添加查询条件
- 查询参数从searchObj中获取
<template>
  <div class="app-container">
    <el-form :inline="true" class="demo-form-inline">
      <el-form-item>
        <el-input v-model="searchObj.hosname" placeholder="医院名称"/>
      </el-form-item>
      <el-form-item>
        <el-input v-model="searchObj.hoscode" placeholder="医院编号"/>
      </el-form-item>
      <el-button type="primary" icon="el-icon-search" @click="fetchList">查询</el-button>
    </el-form>

    <!-- banner列表 -->
    <el-table :data="list" stripe style="width: 100%">
...
  </div>
</template>
2
3
4
5
6
7
8
9
10
11
12
13
14
15
16
17
# 删除操作
# 添加 api
在api/hospset.js中添加 删除操作
import request from '@/utils/request'

export default {
  // ...
  // 删除医院设置
  deleteHospSet(id) {
    return request({
      url: `/admin/hosp/hospitalSet/${id}`,
      method: 'delete'
    })
  },
  // ...
}
2
3
4
5
6
7
8
9
10
11
12
13
# 修改 list.vue页面
添加操作列,包含一个 【删除】按键,调用删除方法
删除方法中,通过弹框判断是否要删除
<template>
  <div class="app-container">
...
    <!-- banner列表 -->
    <el-table :data="list" stripe style="width: 100%">
...
      <el-table-column label="操作" width="280" align="center">
        <template slot-scope="scope">
          <el-button type="danger" size="mini"
                     icon="el-icon-delete" @click="removeDataById(scope.row.id)"/>
        </template>
      </el-table-column>
    </el-table>
    <!-- 分页 -->
...
  </div>
</template>

<script>

import hospset from '@/api/hospset'

export default {
...
  methods: {
...
    removeDataById(_id) {
      this.$confirm('此操作将永久删除医院是设置信息, 是否继续?', '提示', {
        confirmButtonText: '确定',
        cancelButtonText: '取消',
        type: 'warning'
      }).then(() => { // 确定执行then方法
        hospset.deleteHospSet(_id) // 调用接口
          .then(res => {
            // 提示
            this.$message({
              type: 'success',
              message: '删除成功!'
            })
            this.refreshTable()
          })
      })
    },
    refreshTable() {
      // 刷新页面
      this.current = 1
      this.fetchList()
    }
  }
}
</script>
2
3
4
5
6
7
8
9
10
11
12
13
14
15
16
17
18
19
20
21
22
23
24
25
26
27
28
29
30
31
32
33
34
35
36
37
38
39
40
41
42
43
44
45
46
47
48
49
50
51
# 批量删除操作
可以同时删除多个行记录
# 添加api
在api/hospset.js中添加批量删除操作
import request from '@/utils/request'

export default {
  // ...
  // 批量删除
  batchDeleteHospSet(idList) {
    return request({
      url: `/admin/hosp/hospitalSet/batchRemove`,
      method: 'delete',
      data: idList
    })
  }
  // ...
}
2
3
4
5
6
7
8
9
10
11
12
13
14
# 修改list.vue页面
在el-table中增加多选列复选框,增加多选后的回调函数 handleSelectionChange ,接收多选项的值
增加批量删除按键,出发批量删除逻辑
定义批量删除函数 removeRows
<template>
  <div class="app-container">
...
    <!-- 工具条 -->
    <div>
      <el-button type="danger" size="mini" @click="removeRows()">批量删除</el-button>
    </div>

    <!-- banner列表 -->
    <el-table :data="list" stripe style="width: 100%" @selection-change="handleSelectionChange">
      <!-- 多选列 -->
      <el-table-column type="selection" width="55"/>
...
  </div>
</template>

<script>

import hospset from '@/api/hospset'

export default {
  // 定义变量和初始值
  data() {
    return {
...
      multipleSelection: [] // 多选项
    }
  },
...
  methods: {
 ...
    handleSelectionChange(selection) {
      // 当表格复选框选项发生变化的时候触发
      this.multipleSelection = selection
    },
    //批量删除
    removeRows() {
      this.$confirm('此操作将永久删除医院是设置信息, 是否继续?', '提示', {
        confirmButtonText: '确定',
        cancelButtonText: '取消',
        type: 'warning'
      }).then(() => {
        const idList = []
        // 遍历数组得到每个id值,设置到idList里面
        for (let i = 0; i < this.multipleSelection.length; i++) {
          idList.push(this.multipleSelection[i].id)
        }
        // 调用接口
        hospset.batchDeleteHospSet(idList)
          .then(res => {
            this.$message({
              type: 'success',
              message: '删除成功!'
            })
            this.refreshTable()
          })
      })
    },
    refreshTable() {
      // 刷新页面
      this.current = 1
      this.fetchList()
    }
  }
}
</script>
2
3
4
5
6
7
8
9
10
11
12
13
14
15
16
17
18
19
20
21
22
23
24
25
26
27
28
29
30
31
32
33
34
35
36
37
38
39
40
41
42
43
44
45
46
47
48
49
50
51
52
53
54
55
56
57
58
59
60
61
62
63
64
65
66
# 锁定&取消锁定操作
# 添加api
在api/hospset.js中添加锁定和取消锁定操作
import request from '@/utils/request'

export default {
  //...
  // 锁定和取消锁定
  lockHospSet(id, status) {
    return request({
      url: `/admin/hosp/hospitalSet/lockHospitalSet/${id}/${status}`,
      method: 'put'
    })
  }
}
2
3
4
5
6
7
8
9
10
11
12
# 修改list.vue页面
添加锁定和解锁按键,以及对应的逻辑动作,调用api接口
<template>
  <div class="app-container">
...
    <!-- banner列表 -->
    <el-table :data="list" stripe style="width: 100%" @selection-change="handleSelectionChange">
 ...
      <el-table-column label="操作" width="280" align="center">
        <template slot-scope="scope">
          <el-button type="danger" size="mini" icon="el-icon-delete" @click="removeDataById(scope.row.id)">删除
          </el-button>
          <el-button v-if="scope.row.status==1" type="primary" size="mini" icon="el-icon-delete"
                     @click="lockHostSet(scope.row.id,0)">锁定
          </el-button>
          <el-button v-if="scope.row.status==0" type="danger" size="mini" icon="el-icon-delete"
                     @click="lockHostSet(scope.row.id,1)">取消锁定
          </el-button>
        </template>
      </el-table-column>
    </el-table>
  </div>
</template>

<script>

import hospset from '@/api/hospset'

export default {
...
  methods: {
...
    lockHostSet(id, status) { // 锁定和取消锁定
      hospset.lockHospSet(id, status)
        .then(response => {
          this.fetchList()
        })
    }
  }
}
</script>
2
3
4
5
6
7
8
9
10
11
12
13
14
15
16
17
18
19
20
21
22
23
24
25
26
27
28
29
30
31
32
33
34
35
36
37
38
39
# 添加医院设置
# 添加api
在api/hospset.js中添加
import request from '@/utils/request'

export default {
...
  // 添加医院设置
  saveHospSet(hospitalSet) {
    return request({
      url: `/admin/hosp/hospitalSet/saveHospitalSet`,
      method: 'post',
      data: hospitalSet
    })
  }
}
2
3
4
5
6
7
8
9
10
11
12
13
# 修改add.vue页面
<template>
  <div class="app-container">
    <h2>医院设置添加</h2>
    <el-form label-width="120px">
      <el-form-item label="医院名称">
        <el-input v-model="hospitalSet.hosname"/>
      </el-form-item>
      <el-form-item label="医院编号">
        <el-input v-model="hospitalSet.hoscode"/>
      </el-form-item>
      <el-form-item label="api基础路径">
        <el-input v-model="hospitalSet.apiUrl"/>
      </el-form-item>
      <el-form-item label="联系人姓名">
        <el-input v-model="hospitalSet.contactsName"/>
      </el-form-item>
      <el-form-item label="联系人手机">
        <el-input v-model="hospitalSet.contactsPhone"/>
      </el-form-item>
      <el-form-item>
        <el-button type="primary" @click="saveOrUpdate">保存</el-button>
      </el-form-item>
    </el-form>
  </div>
</template>

<script>
import hospset from '@/api/hospset'

export default {
  data() {
    return {
      hospitalSet: {
        hosname: '',
        hoscode: '',
        apiUrl: '',
        contactsName: '',
        contactsPhone: ''
      }
    }
  },
  created() {
  },
  methods: {
    saveOrUpdate() {
      hospset.saveHospSet(this.hospitalSet)
        .then(res => {
          // 提示
          this.$message({ type: 'success', message: '添加成功!' })
          // 跳转列表页面,使用路由跳转方式实现
          this.$router.push({ path: '/hospSet/list' })
        })
    }
  }
}
</script>
2
3
4
5
6
7
8
9
10
11
12
13
14
15
16
17
18
19
20
21
22
23
24
25
26
27
28
29
30
31
32
33
34
35
36
37
38
39
40
41
42
43
44
45
46
47
48
49
50
51
52
53
54
55
56
# 获取医院设置
修改医院设置,首先需要显示医院设置,由于显示信息一致,医院的设置信息页面和添加医院设置页面使用同一个页面
# 添加路由配置
在路由配置js添加修改页面路由
- 共用views/hospSet/add.vue页面
- path上进行传参,使用:id的方式传参,通过
$route.params.id的方式获取 - 设置hidden为true,否则会自动纳入到左侧栏管理,但是编辑页面是通过列表页跳转得到,不能纳入到左侧菜单栏管理
  {
    path: '/hospSet',
    component: Layout,
    redirect: '/hospSet/list',
    name: '医院设置管理',
    meta: { title: '医院设置管理', icon: 'el-icon-s-help' },
    children: [
        ...
      {
        path: 'edit/:id',
        name: '医院设置编辑',
        component: () => import('@/views/hospSet/add'),
        meta: { title: '医院设置编辑', noCache: true },
        hidden: true
      }
    ]
  },
2
3
4
5
6
7
8
9
10
11
12
13
14
15
16
17
# 添加api
import request from '@/utils/request'

export default {
  // ...
  // 医院设置id查询
  getHospSet(id) {
    return request({
      url: `/admin/hosp/hospitalSet/getHospSet/${id}`,
      method: 'get'
    })
  }
}
2
3
4
5
6
7
8
9
10
11
12
# 修改list.vue页面
添加跳转路由到指定编辑页面 add.vue
<template>
  <div class="app-container">
...
    <!-- banner列表 -->
    <el-table :data="list" stripe style="width: 100%" @selection-change="handleSelectionChange">
...
      <el-table-column label="操作" width="280" align="center">
        <template slot-scope="scope">
...
          <router-link :to="'/hospSet/edit/'+scope.row.id">
            <el-button type="primary" size="mini" icon="el-icon-edit"></el-button>
          </router-link>
        </template>
      </el-table-column>
    </el-table>
...
</template>

<script>
...
2
3
4
5
6
7
8
9
10
11
12
13
14
15
16
17
18
19
20
# 修改add.vue页面
用 this.$route.params.id 获取路由中的id
在页面created阶段判断是否要含有id,有id则拉取配置信息,进行回显
<template>
  <div class="app-container">
    <h2>医院设置添加</h2>
    ...
  </div>
</template>

<script>

import hospset from '@/api/hospset'

export default {
  data() {
    return {
      hospitalSet: {
        hosname: '',
        hoscode: '',
        apiUrl: '',
        contactsName: '',
        contactsPhone: ''
      }
    }
  },
  created() {
    // 获取路由id值 调用接口得到医院设置信息
    if (this.$route.params && this.$route.params.id) {
      const id = this.$route.params.id
      this.getHostSet(id)
    }
  },
  methods: {
    // 根据id查询
    getHostSet(id) {
      hospset.getHospSet(id)
        .then(res => {
          this.hospitalSet = res.data
        })
    },
   ...
  }
}
</script>
2
3
4
5
6
7
8
9
10
11
12
13
14
15
16
17
18
19
20
21
22
23
24
25
26
27
28
29
30
31
32
33
34
35
36
37
38
39
40
41
42
# 更新医院设置
在上个阶段,成功回显了数据之后,我们需要对回显的数据进行编辑
# 添加api
import request from '@/utils/request'

export default {
...
  // 修改医院设置
  updateHospSet(hospitalSet) {
    return request({
      url: `/admin/hosp/hospitalSet/updateHospitalSet`,
      method: 'post',
      data: hospitalSet
    })
  }
}
2
3
4
5
6
7
8
9
10
11
12
13
# 修改add.vue页面
添更新逻辑
<template>
  <div class="app-container">
    <h2>医院设置添加</h2>
...
  </div>
</template>

<script>

import hospset from '@/api/hospset'

export default {
...
  methods: {
    ...
    saveOrUpdate() {
      // 判断添加还是修改 , 注意,使用 this.hospitalSet.id == null 的情况是避免 id=0情况下的逻辑错误
      if (this.hospitalSet.id == null || this.hospitalSet.id === '') {
        // 没有id,做添加
        this.save()
      } else {
        this.update()
      }
    },
    save() {
      hospset.saveHospSet(this.hospitalSet)
        .then(res => {
          this.$message({ type: 'success', message: '添加成功!' })
          // 跳转列表页面,使用路由跳转方式实现
          this.$router.push({ path: '/hospSet/list' })
        })
    },
    update() {
      hospset.updateHospSet(this.hospitalSet)
        .then(res => {
          this.$message({ type: 'success', message: '修改成功!' })
          this.$router.push({ path: '/hospSet/list' })
        })
    }
  }
}
</script>
2
3
4
5
6
7
8
9
10
11
12
13
14
15
16
17
18
19
20
21
22
23
24
25
26
27
28
29
30
31
32
33
34
35
36
37
38
39
40
41
42
# 关于组件重用的bug
在参考的视频教学中有此 bug
- vue-router导航切换 时,如果两个路由都渲染同个组件
- 组件的生命周期方法(created或者mounted)不会再被调用, 组件会被重用,显示上一个路由渲染出来的页面内容
但实际操作中没有碰到,可能是使用的vue-admin-template是新版本,解决了这个问题,但如果再出现这个问题,可以如下解决
解决方案
- 在 router-view上加上一个唯一的key,来保证路由切换时都会重新触发生命周期方法,确保组件被重新初始化
- 修改 src/views/layout/components/AppMain.vue 文件如下
- 新版本看到了,给
router-view添加了一个 key ,而key的值是path,这样path变化,页面会重新渲染 - 提示,如果path相同,也想每次都重新加载页面,那么可以在path后添加一个时间戳
- 新版本看到了,给
<template>
  <section class="app-main">
    <transition name="fade-transform" mode="out-in">
      <router-view :key="key" />
    </transition>
  </section>
</template>

<script>
export default {
  name: 'AppMain',
  computed: {
    key() {
      return this.$route.path
    }
  }
}
</script>
...
2
3
4
5
6
7
8
9
10
11
12
13
14
15
16
17
18
19