26.前台系统-实名认证
# 需求分析
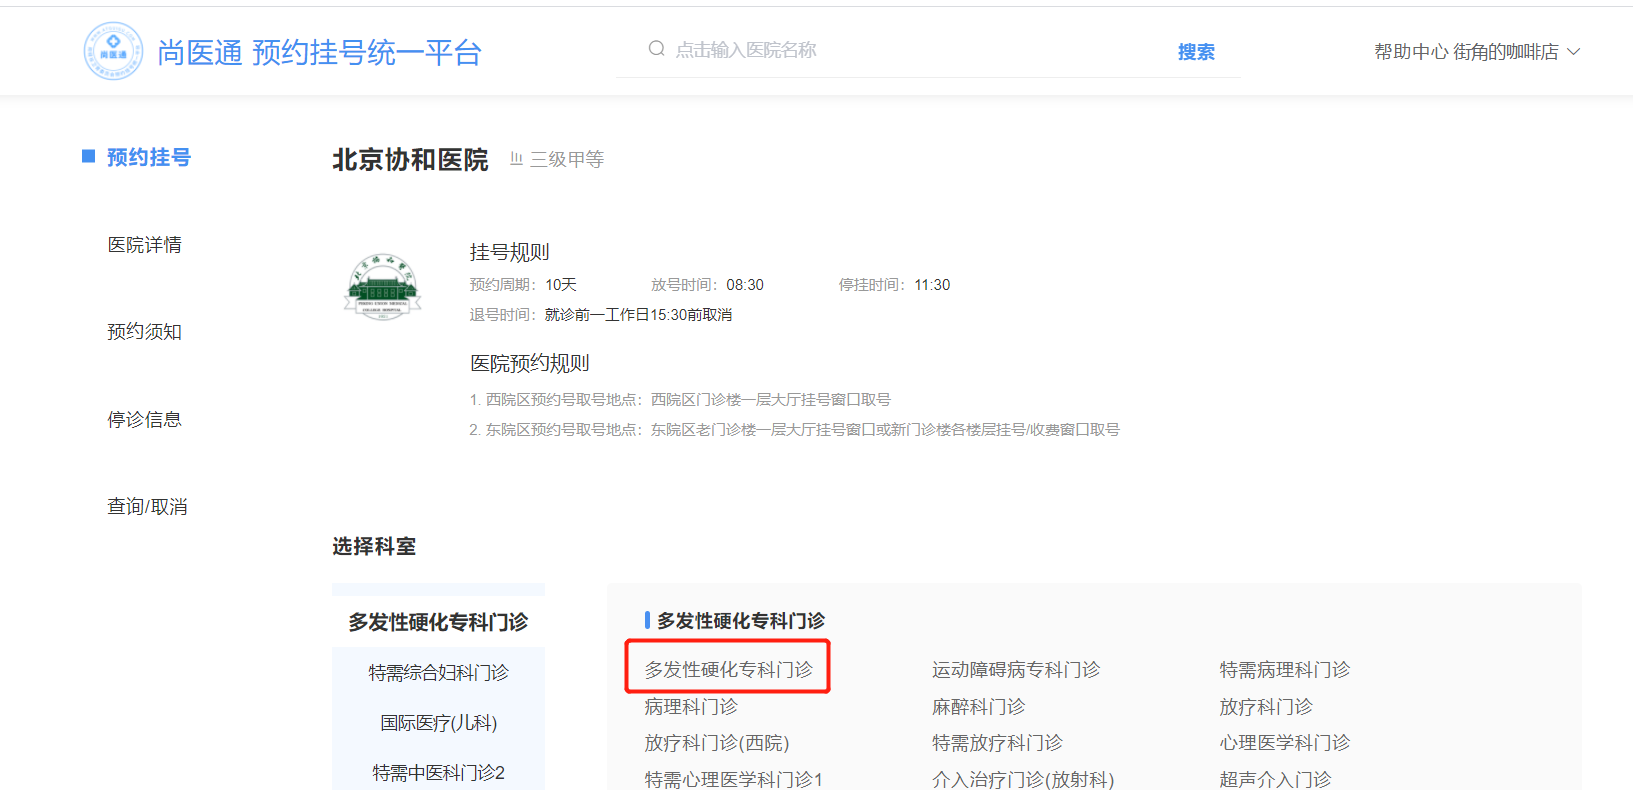
在首页登录完成后,点击实名认证,跳转到用户认证页面
跳转

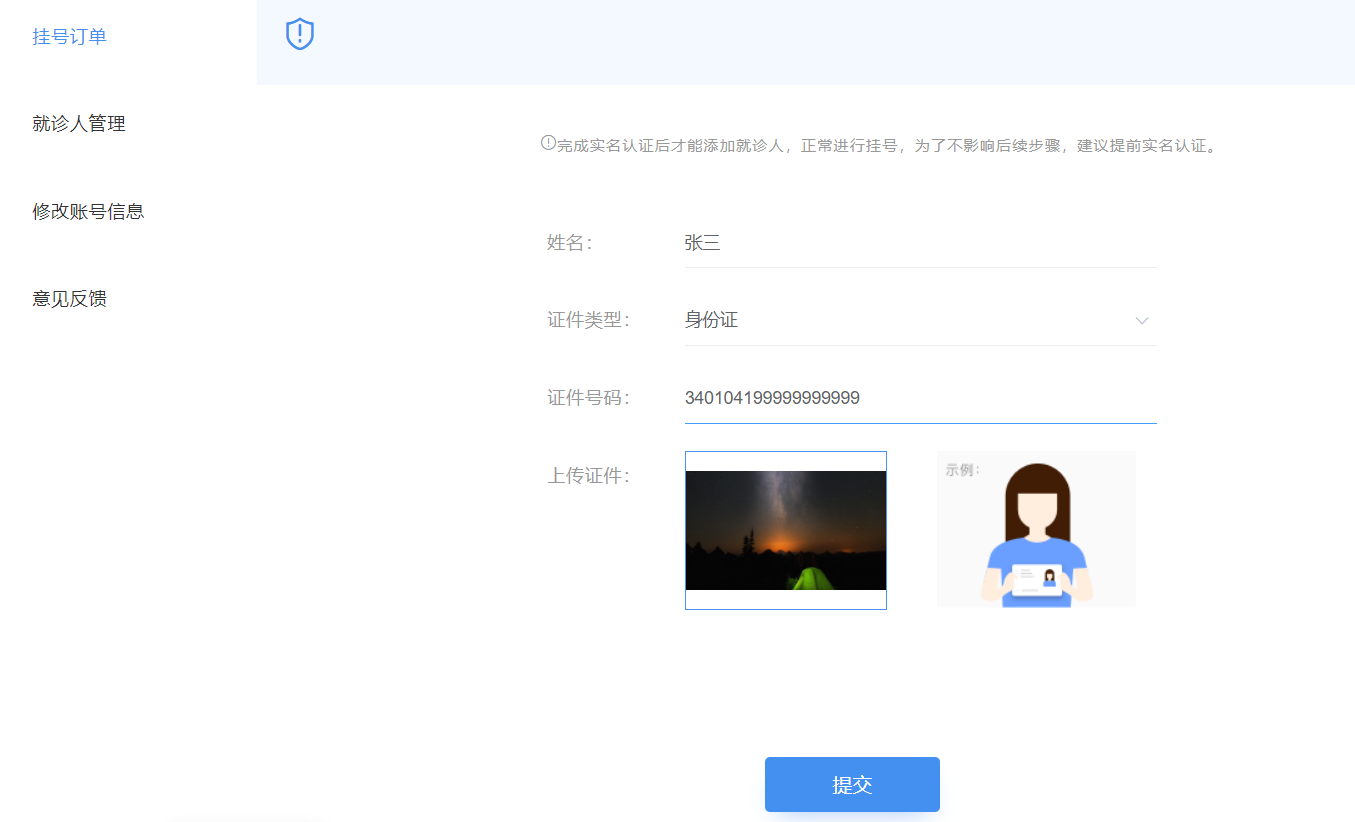
认证页面
用户认证页面中,除了需要填写相应的信息,还需要上传证件照

实名认证
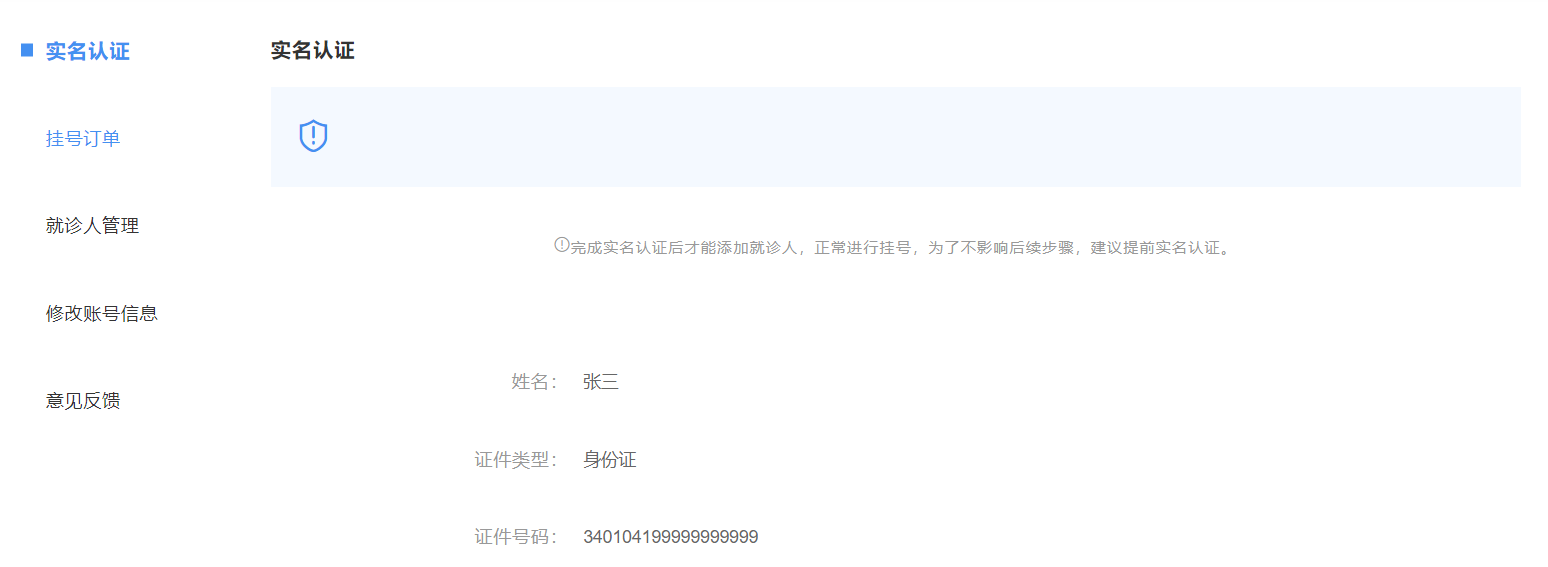
点击提交后

用户登录成功后都要进行身份认证,认证通过后才可以预约挂号
认证过程:用户填写信息(姓名、证件类型、证件号码和证件照片)==> 平台审批
用户认证设计接口
- 提交认证
- 上传证件图片
- 获取提交认证信息
用户认证需要上传证件图片、首页轮播也需要上传图片
需要文件服务
- 阿里云oss是一个很好的分布式文件服务系统
- 集成阿里云oss
# 关于阿里云OSS
提示
简要介绍阿里云OSS的使用和集成
- name: 🏃 阿里云OSS 介绍
  desc: '阿里云OSS简单入门使用'
  link: /pages/f887e6/
  bgColor: '#DFEEE7'
  textColor: '#2A3344'
2
3
4
5
# 搭建service-oss模块
同 service-user模块创建
功能:将上传的文件传输到OSS中,并返回可访问的url
# 修改pom添加依赖
<?xml version="1.0" encoding="UTF-8"?>
<project xmlns="http://maven.apache.org/POM/4.0.0"
         xmlns:xsi="http://www.w3.org/2001/XMLSchema-instance"
         xsi:schemaLocation="http://maven.apache.org/POM/4.0.0 http://maven.apache.org/xsd/maven-4.0.0.xsd">
    <parent>
        <artifactId>service</artifactId>
        <groupId>com.stt.yygh</groupId>
        <version>0.0.1</version>
    </parent>
    <modelVersion>4.0.0</modelVersion>

    <version>1.0</version>
    <artifactId>service-oss</artifactId>
    <packaging>jar</packaging>
    <name>service-oss</name>
    <description>service-oss</description>

    <properties>
        <maven.compiler.source>8</maven.compiler.source>
        <maven.compiler.target>8</maven.compiler.target>
    </properties>

    <dependencies>
        <!-- 阿里云oss依赖 -->
        <dependency>
            <groupId>com.aliyun.oss</groupId>
            <artifactId>aliyun-sdk-oss</artifactId>
        </dependency>

        <!-- 日期工具栏依赖 -->
        <dependency>
            <groupId>joda-time</groupId>
            <artifactId>joda-time</artifactId>
        </dependency>
    </dependencies>

</project>
2
3
4
5
6
7
8
9
10
11
12
13
14
15
16
17
18
19
20
21
22
23
24
25
26
27
28
29
30
31
32
33
34
35
36
37
# 添加配置文件
# 服务端口
server.port=8205

# 服务名
spring.application.name=service-oss

#返回json的全局时间格式
spring.jackson.date-format=yyyy-MM-dd HH:mm:ss
spring.jackson.time-zone=GMT+8

# nacos服务地址
spring.cloud.nacos.discovery.server-addr=127.0.0.1:8848

aliyun.oss.endpoint=oss-cn-beijing.aliyuncs.com
aliyun.oss.accessKeyId=LTAI5tCPu1DG9Xdt48WrbcEv
aliyun.oss.secret=90ZEK9oaPCtUZwdvBdAFpwgzVFA7Mw
aliyun.oss.bucket=my-demos-oss
2
3
4
5
6
7
8
9
10
11
12
13
14
15
16
17
# 配置启动类
package com.stt.yygh.oss;

import org.springframework.boot.SpringApplication;
import org.springframework.boot.autoconfigure.SpringBootApplication;
import org.springframework.boot.autoconfigure.jdbc.DataSourceAutoConfiguration;
import org.springframework.cloud.client.discovery.EnableDiscoveryClient;
import org.springframework.context.annotation.ComponentScan;

//取消数据源自动配置
@SpringBootApplication(exclude = DataSourceAutoConfiguration.class)
@EnableDiscoveryClient
@ComponentScan(basePackages = {"com.stt"})
public class ServiceOssApplication {
    public static void main(String[] args) {
        SpringApplication.run(ServiceOssApplication.class, args);
    }
}
2
3
4
5
6
7
8
9
10
11
12
13
14
15
16
17
# 配置网关 service-gateway
在 service-gateway 中配置路由信息
#设置路由id
spring.cloud.gateway.routes[5].id=service-oss
spring.cloud.gateway.routes[5].uri=lb://service-oss
spring.cloud.gateway.routes[5].predicates= Path=/*/oss/**
2
3
4
# 创建读取配置类
创建 com.stt.yygh.oss.utils.ConstantOssPropertiesUtils 类,用于读取application.properties中关于OSS的配置信息
package com.stt.yygh.oss.utils;

import org.springframework.beans.factory.InitializingBean;
import org.springframework.beans.factory.annotation.Value;
import org.springframework.stereotype.Component;

@Component
public class ConstantOssPropertiesUtils implements InitializingBean {

    @Value("${aliyun.oss.endpoint}")
    private String endpoint;

    @Value("${aliyun.oss.accessKeyId}")
    private String accessKeyId;

    @Value("${aliyun.oss.secret}")
    private String secret;

    @Value("${aliyun.oss.bucket}")
    private String bucket;

    public static String EDNPOINT;
    public static String ACCESS_KEY_ID;
    public static String SECRECT;
    public static String BUCKET;

    @Override
    public void afterPropertiesSet() throws Exception {
        EDNPOINT=endpoint;
        ACCESS_KEY_ID=accessKeyId;
        SECRECT=secret;
        BUCKET=bucket;
    }
}
2
3
4
5
6
7
8
9
10
11
12
13
14
15
16
17
18
19
20
21
22
23
24
25
26
27
28
29
30
31
32
33
34
# 创建Service
创建 com.stt.yygh.oss.service.FileService ,添加上传接口
package com.stt.yygh.oss.service;

import org.springframework.web.multipart.MultipartFile;

public interface FileService {
    //上传文件到阿里云oss
    String upload(MultipartFile file);
}
2
3
4
5
6
7
8
创建 com.stt.yygh.oss.service.impl.FileServiceImpl 实现上传接口,返回上传成功后的可访问的url
- 注意:每次上传到指定日期的文件夹下,并设置uuid作为文件前缀,防止有重复文件上传,覆盖原先的文件
package com.stt.yygh.oss.service.impl;

import com.aliyun.oss.OSS;
import com.aliyun.oss.OSSClientBuilder;
import com.stt.yygh.oss.service.FileService;
import com.stt.yygh.oss.utils.ConstantOssPropertiesUtils;
import org.joda.time.DateTime;
import org.springframework.stereotype.Service;
import org.springframework.web.multipart.MultipartFile;

import java.io.IOException;
import java.io.InputStream;
import java.util.UUID;

@Service
public class FileServiceImpl implements FileService {


    @Override
    public String upload(MultipartFile file) {
        // Endpoint以杭州为例,其它Region请按实际情况填写。
        String endpoint = ConstantOssPropertiesUtils.EDNPOINT;
        String accessKeyId = ConstantOssPropertiesUtils.ACCESS_KEY_ID;
        String accessKeySecret = ConstantOssPropertiesUtils.SECRECT;
        String bucketName = ConstantOssPropertiesUtils.BUCKET;
        try {
            // 创建OSSClient实例
            OSS ossClient = new OSSClientBuilder().build(endpoint, accessKeyId, accessKeySecret);

            // 上传文件流
            InputStream inputStream = file.getInputStream();
            String fileName = file.getOriginalFilename();

            // 注意:每次在Bucket中上传到指定日期格式下的文件夹,以及每次使用随机uid作为文件前缀,为了防止有相同名称的文件上传覆盖
            //生成随机唯一值,使用uuid,添加到文件名称里面
            String uuid = UUID.randomUUID().toString().replaceAll("-", "");
            fileName = uuid + fileName;

            //按照当前日期,创建文件夹,上传到创建文件夹里面,如:2021/02/02/01.jpg
            String dir = new DateTime().toString("yyyy/MM/dd");
            fileName = dir + "/" + fileName;

            //调用方法实现上传
            ossClient.putObject(bucketName, fileName, inputStream);
            ossClient.shutdown();
            //上传之后文件路径
            // https://yy-xxx.oss-cn-beijing.aliyuncs.com/01.jpg
            return "https://" + bucketName + "." + endpoint + "/" + fileName;
        } catch (IOException e) {
            e.printStackTrace();
        }
        return null;
    }
}
2
3
4
5
6
7
8
9
10
11
12
13
14
15
16
17
18
19
20
21
22
23
24
25
26
27
28
29
30
31
32
33
34
35
36
37
38
39
40
41
42
43
44
45
46
47
48
49
50
51
52
53
54
# 创建controller
创建com.stt.yygh.oss.controller.FileApiController 类
package com.stt.yygh.oss.controller;

import com.stt.yygh.common.result.Result;
import com.stt.yygh.oss.service.FileService;
import org.springframework.beans.factory.annotation.Autowired;
import org.springframework.web.bind.annotation.PostMapping;
import org.springframework.web.bind.annotation.RequestMapping;
import org.springframework.web.bind.annotation.RestController;
import org.springframework.web.multipart.MultipartFile;

@RestController
@RequestMapping("/api/oss/file")
public class FileApiController {

    @Autowired
    private FileService fileService;

    //上传文件到阿里云oss
    @PostMapping("fileUpload")
    public Result fileUpload(MultipartFile file) {
        //获取上传文件
        String url = fileService.upload(file);
        return Result.ok(url);
    }
}
2
3
4
5
6
7
8
9
10
11
12
13
14
15
16
17
18
19
20
21
22
23
24
25
# 测试
启动服务,由于在本地环境测试的服务较多,在idea的每个项目启动配置中VM optons: -Xmx128m,配置jvm最大可用内存
使用swagger2进行上传操作 http://localhost:8205/swagger-ui.html#/file45api45controller
上传成功后返回json
{
  "code": 200,
  "message": "成功",
  "data": "https://my-demos-oss.oss-cn-beijing.aliyuncs.com/2022/01/01/025878d6409d4bac9dcec49c33bc059c1.png",
  "ok": true
}
2
3
4
5
6
# 实现用户认证 service-user
# 创建认证信息获取vo类
在module模块中创建 UserAuthVo 类
package com.stt.yygh.vo.user;

import io.swagger.annotations.ApiModel;
import io.swagger.annotations.ApiModelProperty;
import lombok.Data;

@Data
@ApiModel(description="会员认证对象")
public class UserAuthVo {

    @ApiModelProperty(value = "用户姓名")
    private String name;

    @ApiModelProperty(value = "证件类型")
    private String certificatesType;

    @ApiModelProperty(value = "证件编号")
    private String certificatesNo;

    @ApiModelProperty(value = "证件路径")
    private String certificatesUrl;

}
2
3
4
5
6
7
8
9
10
11
12
13
14
15
16
17
18
19
20
21
22
23
# 创建认证状态枚举类
在module模块中添加枚举类 AuthStatusEnum (如果之前一次性从资料中导入所有枚举类,可以不用添加)
该枚举类表示了认证的4个状态
package com.stt.yygh.enums;

public enum AuthStatusEnum {

    NO_AUTH(0, "未认证"),
    AUTH_RUN(1, "认证中"),
    AUTH_SUCCESS(2, "认证成功"),
    AUTH_FAIL(-1, "认证失败"),
    ;

    private Integer status;
    private String name;

    AuthStatusEnum(Integer status, String name) {
        this.status = status;
        this.name = name;
    }

    public static String getStatusNameByStatus(Integer status) {
        AuthStatusEnum arrObj[] = AuthStatusEnum.values();
        for (AuthStatusEnum obj : arrObj) {
            if (status.intValue() == obj.getStatus().intValue()) {
                return obj.getName();
            }
        }
        return "";
    }


    public Integer getStatus() {
        return status;
    }

    public void setStatus(Integer status) {
        this.status = status;
    }

    public String getName() {
        return name;
    }

    public void setName(String name) {
        this.name = name;
    }
}
2
3
4
5
6
7
8
9
10
11
12
13
14
15
16
17
18
19
20
21
22
23
24
25
26
27
28
29
30
31
32
33
34
35
36
37
38
39
40
41
42
43
44
45
# 实现service接口
在 UserInfoService 中添加用户认证接口
package com.stt.yygh.user.service;

import com.baomidou.mybatisplus.extension.service.IService;
import com.stt.yygh.model.user.UserInfo;
import com.stt.yygh.vo.user.LoginVo;
import com.stt.yygh.vo.user.UserAuthVo;

import java.util.Map;

public interface UserInfoService extends IService<UserInfo> {
...
    //用户认证
    void userAuth(Long userId, UserAuthVo userAuthVo);
}
2
3
4
5
6
7
8
9
10
11
12
13
14
在UserInfoServiceImpl中实现该接口
package com.stt.yygh.user.service.impl;
...
@Service
public class UserInfoServiceImpl extends ServiceImpl<UserInfoMapper, UserInfo> implements UserInfoService {
...

    @Override
    public void userAuth(Long userId, UserAuthVo userAuthVo) {
        //根据用户id查询用户信息
        UserInfo userInfo = baseMapper.selectById(userId);
        //设置认证信息
        //认证人姓名
        userInfo.setName(userAuthVo.getName());
        //其他认证信息
        userInfo.setCertificatesType(userAuthVo.getCertificatesType());
        userInfo.setCertificatesNo(userAuthVo.getCertificatesNo());
        userInfo.setCertificatesUrl(userAuthVo.getCertificatesUrl());
        userInfo.setAuthStatus(AuthStatusEnum.AUTH_RUN.getStatus());
        //进行信息更新
        baseMapper.updateById(userInfo);
    }
...
}
2
3
4
5
6
7
8
9
10
11
12
13
14
15
16
17
18
19
20
21
22
23
# 编写工具类
在service-util中创建工具类AuthContextHolder,用于获取请求中的jwt token,以及从jwt中获取userId以及userName
package com.stt.yygh.common.utils;

import com.stt.yygh.common.helper.JwtHelper;

import javax.servlet.http.HttpServletRequest;

//获取当前用户信息工具类
public class AuthContextHolder {
    //获取当前用户id
    public static Long getUserId(HttpServletRequest request) {
        //从header获取token
        String token = request.getHeader("token");
        //jwt从token获取userid
        Long userId = JwtHelper.getUserId(token);
        return userId;
    }
    //获取当前用户名称
    public static String getUserName(HttpServletRequest request) {
        //从header获取token
        String token = request.getHeader("token");
        //jwt从token获取userid
        String userName = JwtHelper.getUserName(token);
        return userName;
    }
}
2
3
4
5
6
7
8
9
10
11
12
13
14
15
16
17
18
19
20
21
22
23
24
25
# 实现controller
在UserInfoApiController类添加方法
package com.stt.yygh.user.controller;

import com.stt.yygh.common.result.Result;
import com.stt.yygh.common.utils.AuthContextHolder;
import com.stt.yygh.model.user.UserInfo;
import com.stt.yygh.user.service.UserInfoService;
import com.stt.yygh.user.utils.IpUtil;
import com.stt.yygh.vo.user.LoginVo;
import com.stt.yygh.vo.user.UserAuthVo;
import io.swagger.annotations.ApiOperation;
import org.springframework.beans.factory.annotation.Autowired;
import org.springframework.web.bind.annotation.*;

import javax.servlet.http.HttpServletRequest;
import java.util.Map;

@RestController
@RequestMapping("/api/user")
public class UserInfoApiController {

    @Autowired
    private UserInfoService service;

...
    //用户认证接口
    @PostMapping("auth/userAuth")
    public Result userAuth(@RequestBody UserAuthVo userAuthVo, HttpServletRequest request) {
        //传递两个参数,第一个参数用户id,第二个参数认证数据vo对象
        service.userAuth(AuthContextHolder.getUserId(request),userAuthVo);
        return Result.ok();
    }

    //获取用户id信息接口
    @GetMapping("auth/getUserInfo")
    public Result getUserInfo(HttpServletRequest request) {
        Long userId = AuthContextHolder.getUserId(request);
        UserInfo userInfo = service.getById(userId);
        return Result.ok(userInfo);
    }
}
2
3
4
5
6
7
8
9
10
11
12
13
14
15
16
17
18
19
20
21
22
23
24
25
26
27
28
29
30
31
32
33
34
35
36
37
38
39
40
# 实现用户认证 yygh-site
# 添加api
在/api/userInfo.js添加方法
import request from '~/utils/request'

const api_name = `/api/user`
...

export function getUserInfo() {
  return request({
    url: `${api_name}/auth/getUserInfo`,
    method: `get`
  })
}

export function saveUserAuth(userAuth) {
  return request({
    url: `${api_name}/auth/userAuth`,
    method: 'post',
    data: userAuth
  })
}
2
3
4
5
6
7
8
9
10
11
12
13
14
15
16
17
18
19
# 创建用户认证页面
创建 /pages/user/index.vue 页面文件
用户认证页面

该页面是用户认证页面,通过登录后点击用户认证跳转
<template>
<div class="nav-container page-component">
<!--左侧导航 #start -->
<div class="nav left-nav">
<div class="nav-item selected">
<span class="v-link selected dark" @click="toPage('/user')">实名认证 </span>
</div>
<div class="nav-item">
<span class="v-link selected dark" @click="toPage('/order')"> 挂号订单 </span>
</div>
<div class="nav-item ">
<span class="v-link clickable dark" @click="toPage('/patient')"> 就诊人管理 </span>
</div>
<div class="nav-item "><span class="v-link clickable dark"> 修改账号信息 </span></div>
<div class="nav-item "><span class="v-link clickable dark"> 意见反馈 </span></div>
</div>
<!-- 左侧导航 #end -->
<!-- 右侧内容 #start -->
<div class="page-container">
<div class="title"> 实名认证</div>
<div class="status-bar">
<div class="status-wrapper"><span class="iconfont"></span>{{ userInfo.param.authStatusString }}</div>
</div>
<div class="tips">
<span class="iconfont"></span>
完成实名认证后才能添加就诊人,正常进行挂号,为了不影响后续步骤,建议提前实名认证。
</div>
<div class="form-wrapper" v-if="userInfo.authStatus == 0">
<div>
<el-form :model="userAuth" label-width="110px" label-position="left">
<el-form-item prop="name" label="姓名:" class="form-normal">
<div class="name-input">
<el-input v-model="userAuth.name" placeholder="请输入联系人姓名全称" class="input v-input"/>
</div>
</el-form-item>
<el-form-item prop="certificatesType" label="证件类型:">
<el-select v-model="userAuth.certificatesType" placeholder="请选择证件类型" class="v-select patient-select">
<el-option v-for="item in certificatesTypeList" :key="item.value"
:label="item.name" :value="item.name">
</el-option>
</el-select>
</el-form-item>
<el-form-item prop="certificatesNo" label="证件号码:">
<el-input v-model="userAuth.certificatesNo" placeholder="请输入联系人证件号码" class="input v-input"/>
</el-form-item>
<el-form-item prop="name" label="上传证件:">
<div class="upload-wrapper">
<div class="avatar-uploader">
<el-upload class="avatar-uploader" :action="fileUrl" :show-file-list="false"
:on-success="onUploadSuccess">
<div class="upload-inner-wrapper">
<img v-if="userAuth.certificatesUrl" :src="userAuth.certificatesUrl" class="avatar">
<i v-else class="el-icon-plus avatar-uploader-icon"></i>
<div v-if="!userAuth.certificatesUrl" class="text"> 上传证件合照</div>
</div>
</el-upload>
</div>
<img src="//img.114yygh.com/static/web/auth_example.png" class="example">
</div>
</el-form-item>
</el-form>
<div class="bottom-wrapper">
<div class="button-wrapper">
<div class="v-button" @click="saveUserAuth()">{{ submitBnt }}</div>
</div>
</div>
</div>
</div>
<div class="context-container" v-if="userInfo.authStatus != 0">
<div>
<el-form :model="userAuth" label-width="110px" label-position="right">
<el-form-item prop="name" label="姓名:" class="form-normal">
<div class="name-input">{{ userInfo.name }}</div>
</el-form-item>
<el-form-item prop="name" label="证件类型:">{{ userInfo.certificatesType }}</el-form-item>
<el-form-item prop="name" label="证件号码:">{{ userInfo.certificatesNo }}</el-form-item>
</el-form>
</div>
</div>
</div><!-- 右侧内容 #end -->
<!-- 登录弹出框 -->
</div>
</template>
<script>
import '~/assets/css/hospital_personal.css'
import '~/assets/css/hospital.css'
import '~/assets/css/personal.css'
import { getUserInfo, saveUserAuth } from '@/api/user/userInfo'
import { findByDictCode } from '@/api/cmn/dict'
import { getBaseUrl } from '@/utils/request'
export default {
data() {
return {
userAuth: {
name: '',
certificatesType: '',
certificatesNo: '',
certificatesUrl: ''
},
certificatesTypeList: [],
fileUrl: '',
userInfo: {
param: {}
},
submitBnt: '提交'
}
},
created() {
this.init()
this.fileUrl = getBaseUrl() + '/api/oss/file/fileUpload'
},
methods: {
toPage(path) {
window.location = path
},
init() {
this.getUserInfo()
this.getDict()
},
getUserInfo() {
getUserInfo().then(res => {
this.userInfo = res.data
})
},
saveUserAuth() {
if (this.submitBnt === '正在提交...') {
this.$message.info('重复提交')
return
}
this.submitBnt = '正在提交...'
saveUserAuth(this.userAuth).then(res => {
this.$message.success('提交成功')
window.location.reload()
}).catch(e => {
this.submitBnt = '提交'
})
},
getDict() {
// 证件类型
findByDictCode('CertificatesType').then(res => {
this.certificatesTypeList = res.data
})
},
onUploadSuccess(res, file) {
if (res.code !== 200) {
this.$message.error('上传失败')
return
}
// 填充上传文件列表
this.userAuth.certificatesUrl = file.response.data
}
}
}
</script>
<style>
.header-wrapper .title {
font-size: 16px;
margin-top: 0;
}
.content-wrapper {
margin-left: 0;
}
.patient-card .el-card__header .detail {
font-size: 14px;
}
.page-container .title {
letter-spacing: 1px;
font-weight: 700;
color: #333;
font-size: 16px;
margin-top: 0;
margin-bottom: 20px;
}
.page-container .tips {
width: 100%;
padding-left: 0;
}
.page-container .form-wrapper {
padding-left: 92px;
width: 580px;
}
.form-normal {
height: 40px;
}
.bottom-wrapper {
width: 100%;
padding: 0;
margin-top: 0;
}
</style>
2
3
4
5
6
7
8
9
10
11
12
13
14
15
16
17
18
19
20
21
22
23
24
25
26
27
28
29
30
31
32
33
34
35
36
37
38
39
40
41
42
43
44
45
46
47
48
49
50
51
52
53
54
55
56
57
58
59
60
61
62
63
64
65
66
67
68
69
70
71
72
73
74
75
76
77
78
79
80
81
82
83
84
85
86
87
88
89
90
91
92
93
94
95
96
97
98
99
100
101
102
103
104
105
106
107
108
109
110
111
112
113
114
115
116
117
118
119
120
121
122
123
124
125
126
127
128
129
130
131
132
133
134
135
136
137
138
139
140
141
142
143
144
145
146
147
148
149
150
151
152
153
154
155
156
157
158
159
160
161
162
163
164
165
166
167
168
169
170
171
172
173
174
175
176
177
178
179
180
181
182
183
184
185
186
187
188
189
190
191
192
193
194
195
196
197
198
199
注意:由于BaseUrl需要获取,因此修改了utils/request.js中获取BaseUrl的代码,增加了getBaseUrl方法
import axios from 'axios'
import { Message } from 'element-ui'
import cookie from 'js-cookie'


export function getBaseUrl() {
  return 'http://localhost:8080'
}

// 创建axios实例
const service = axios.create({
  baseURL: getBaseUrl(),
  timeout: 15000 // 请求超时时间
})
...
2
3
4
5
6
7
8
9
10
11
12
13
14
15
# 医院页面调整

如果要预约挂号,必须要认证通过后才可以,所以在预约挂号前要做认证判断,如果没有认证通过,则跳转到认证页面
修改/pages/hospital/_hoscode.vue组件
<template>
...
</template>

<script>
...
import { getUserInfo } from '@/api/user/userInfo'

export default {
...
  methods: {
   ...
    schedule(depcode) {
      // 登录判断
      let token = cookie.get('token')
      if (!token) {
        loginEvent.$emit('loginDialogEvent')
        return
      }
      //判断认证
      getUserInfo().then(res => {
        let authStatus = res.data.authStatus
        // 状态为2认证通过
        if (!authStatus || authStatus != 2) {
          window.location.href = '/user'
          return
        }
        window.location.href = '/hospital/schedule?hoscode=' + this.hospital.hoscode + '&depcode=' + depcode
      })
    }
  }
}
</script>
2
3
4
5
6
7
8
9
10
11
12
13
14
15
16
17
18
19
20
21
22
23
24
25
26
27
28
29
30
31
32
33
